# gobuffalo介绍
虽然
Buffalo可以被认为是一个框架,但它主要是Go和Javascript库精心组合而成的生态系统。这些组件中的大多数可以切换为另一个组件,但是我们将仅对此默认组合提供支持
# 1 安装数据库连接环境
特别注意:从2019年12月1日开始,
Buffalo和所有相关软件包都需要Go Modules,并且GOPATH不再支持使用该模块。$GOPATH$并且最低Go版本为1.13具体说明链接
# 1.1 安装环境必需的依赖项
- 可行的Go环境
- 已配置的$PATH环境变量,包括$GOPATH/bin。
- 转到版本>=1.13。
# 2 pop基础安装及使用
pop是gobuffalo默认的orm包,当然也可以在其他项目使用pop。但是pop官方强调自己不是orm,只是具备orm的功能。
pop主要优点
- CRUD 操作
- 代码定义模型
- 用于创建,删除和修改的迁移工具
- 数据库支持:PostgreSQL,MySQL,SQLite
- ActiveRecord UUID 模式
- YAML 配置
- 易于环境变量使用
- 创建和更新每条记录的时间戳
- 支持事务
# 2.1 soda安装
大多数
Golang软件包的安装都是典型的,但是我们还将安装soda实用程序,该实用程序将促进数据库迁移和模型创建。
不需要使用sqlite 3数据库支持,例如使用mysql,执行以下命令安装soda
$ go get github.com/gobuffalo/pop/...
$ go install github.com/gobuffalo/pop/soda
2
需要sqlite 3支持(需要GCC或等效的C编译器),执行以下命令安装:
$ go get -u -v -tags sqlite github.com/gobuffalo/pop/...
$ go install -tags sqlite github.com/gobuffalo/pop/soda
2
如果您不使用构建代码buffalo build,则在构建程序时还必须传递-tags sqlite给go build。
# 2.2 pop配置
通过YAML文件配置弹出。每个节均按环境细分,因此您可以针对每个环境进行配置。在您的项目根目录中,创建文件
database.yml或者config/database.yml,或者自定义配置文件。可以通过将-e development标志传递到任何命令中来标识开发环境。
development:
  dialect: "mysql"      #数据库类型
  database: "kratos"    #数据库名称
  host: "localhost"     #数据库连接地址
  port: "3306"          #数据库连接端口号
  user: "root"          #数据库连接用户名账号
  password: "admin"     #数据库连接账号密码
2
3
4
5
6
7
# 2.3 创建模型
pop提供一个实用工具soda。用soda可以创建模型。
$ soda generate model user title:string first_name:string last_name:string bio:text -e development
v3.41.1

--> models/user.go
--> models/user_test.go
--> goimports -w models/user.go models/user_test.go
> migrations/20191225173819_create_users.up.fizz
> migrations/20191225173819_create_users.down.fizz
2
3
4
5
6
7
8
9
soda创建了两个文件夹:models和migrations。用户模型存储在其中models/user.go,初始迁移存储在 migrations/20191225173819_create_users.up.fizz。fizz 下面会讲到如何使用。
# 2.4 创建数据库
1、在执行soda命令根目录下有
database.yml或者config/database.yml时,并且数据库服务器正在运行,Soda可以在database.yml使用一个简单的命令在文件中创建所有数据库,如下: -e development 代表创建开发环境下的数据库,当然也可以是 test 和 production。
$ soda create -e development
2、在执行soda命令根目录下 没有
database.yml或者config/database.yml时,则必须指定配置文件路径创建数据库,如下
soda create -e development -c ./contrib/sql/.soda.yml
# 2.5 完成 fizz
编辑 migrations/20191225173819_create_users.up.fizz 文件,下面代码相当于创建一张
user表 然后添加两条数据。 具体数据操作语法请参考gobuffalo官网
create_table("users") {
    t.Column("id", "uuid", {primary: true})
    t.Timestamps()
    t.Column("name", "string", {})
    t.Column("email", "string", {})
    t.Column("password_hash", "string", {"size":64})
    t.Column("register_time", "timestamp", {"default": null})
    t.Column("last_login_time", "timestamp", {"default": null})
}

add_index("users", "name", {"unique": true})
add_index("users", "email", {"unique": true})
2
3
4
5
6
7
8
9
10
11
12
# 2.6 运行迁移
1 在执行soda migrate命令迁移数据时,根目录下有
database.yml或者config/database.yml时,并且数据库服务器正在运行,soda可以使用下面命令迁移数据库,迁移的数据表位置在执行soda命令位置的./migrations文件夹下面的所有fizz后缀的文件
soda migrate up -e development
2 在执行soda migrate命令迁移数据时,根目录下 没有
database.yml或者config/database.yml时,则必须指定迁移配置的yml,迁移的文件路径在自定义的yml目录的./migrations文件夹下面的所有fizz后缀的文件
soda migrate up -e development -c ./contrib/sql/.soda.yml
这样,我们的数据库,数据表都已经创建完成了。
# 3 Golang操作数据库说明
# 3.1 连接数据库
tx, err := pop.Connect("development")
if err != nil {
    log.Panic(err)
}
2
3
4
# 3.2 创建新纪录
jessica := models.User{
        Title: "Ms.",
        FirstName: "Jessica",
        LastName: "Jones",
        Bio: "Private security, super hero.",
    }
    _, err = tx.ValidateAndSave(&jessica)
    if err != nil {
        log.Panic(err)
    }
2
3
4
5
6
7
8
9
10
# 3.3 按 ID 查询一条记录
  id := "240ec3c5-019d-4031-9c27-8a553e022297"
    frank := models.User{}
    err = tx.Find(&frank, id)
    if err != nil {
        fmt.Print("ERROR!\n")
        fmt.Printf("%v\n", err)
    } else {
        fmt.Print("Success!\n")
        fmt.Printf("%v\n", frank)
    }
2
3
4
5
6
7
8
9
10
# 3.4 查询所有记录
users := []models.User{}
    err = tx.All(&users)
    if err != nil {
        fmt.Print("ERROR!\n")
        fmt.Printf("%v\n", err)
    } else {
        fmt.Print("Success!\n")
        fmt.Printf("%v\n", users)
    }
2
3
4
5
6
7
8
9
# 3.5 模糊查询某些数据
query := tx.Where("last_name = 'Rand' OR last_name = 'Murdock'")
    users := []models.User{}
    err = query.All(&users)
    if err != nil {
        fmt.Print("ERROR!\n")
        fmt.Printf("%v\n", err)
    } else {
        fmt.Print("Success!\n")
        fmt.Printf("%v\n", users)
    }
2
3
4
5
6
7
8
9
10
# 3.6 更新单个记录
 query := tx.Where("title = 'Ms.'")
    users := []models.User{}
    err = query.All(&users)
    if err != nil {
        fmt.Print("ERROR!\n")
        fmt.Printf("%v\n", err)
    } else {
        for i := 0; i < len(users); i++ {
            user := users[i]
            user.Title = "Mrs."
            tx.ValidateAndSave(&user)
            fmt.Print("Success!\n")
            fmt.Printf("%v\n", user)
        }
    }
2
3
4
5
6
7
8
9
10
11
12
13
14
15
# 3.7 更新多个记录
更新多个记录与更新单个记录非常相似
users := []models.User{}
    err = tx.All(&users)
    if err != nil {
        fmt.Print("ERROR!\n")
        fmt.Printf("%v\n", err)
    } else {
        for i := 0; i < len(users); i++ {
            user := users[i]
            user.Location = "NYC, NY"
            tx.ValidateAndSave(&user)
            fmt.Print("Success!\n")
            fmt.Printf("%v\n", user)
        }
    }
2
3
4
5
6
7
8
9
10
11
12
13
14
# 3.8 删除单个记录
  id := "240ec3c5-019d-4031-9c27-8a553e022297"
    frank := models.User{}
    err = tx.Find(&frank, id)
    if err != nil {
        fmt.Print("ERROR!\n")
        fmt.Printf("%v\n", err)
    } else {
        fmt.Print("Success! - Now delete it.\n")
        tx.Destroy(&frank)
    }
2
3
4
5
6
7
8
9
10
# 4 迁移数据到mysql示例
备注:从这里开始使用Goland编译器来操作kratos项目
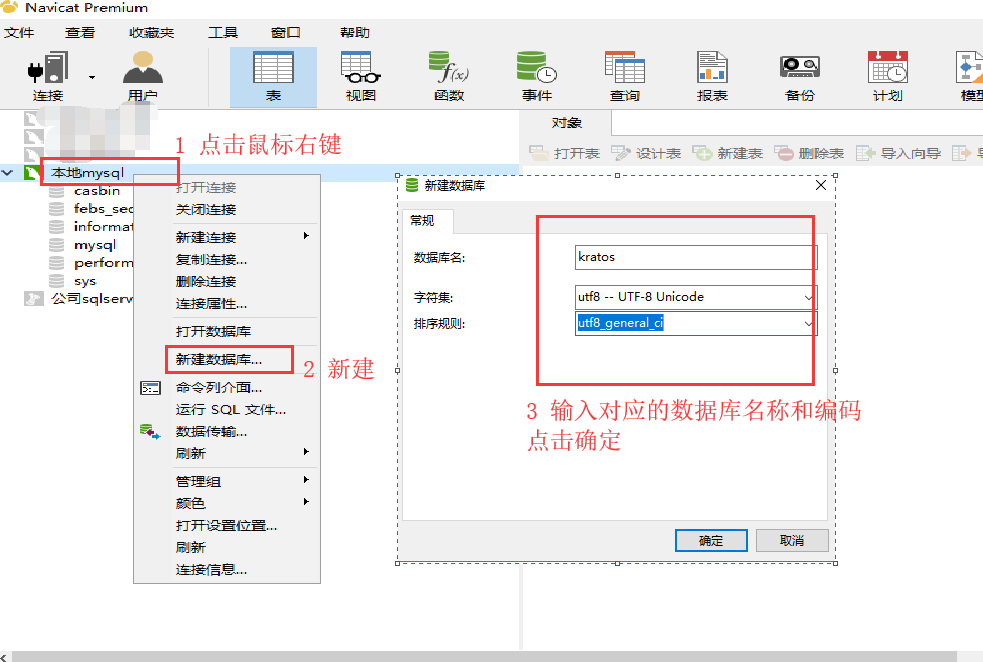
# 4.1 用Navicat创建一个数据库kratos
# 4.2 进行kratos项目数据迁移
# 4.2.1 项目路径在%GOPATH%\src\kratos\persistence\sql\
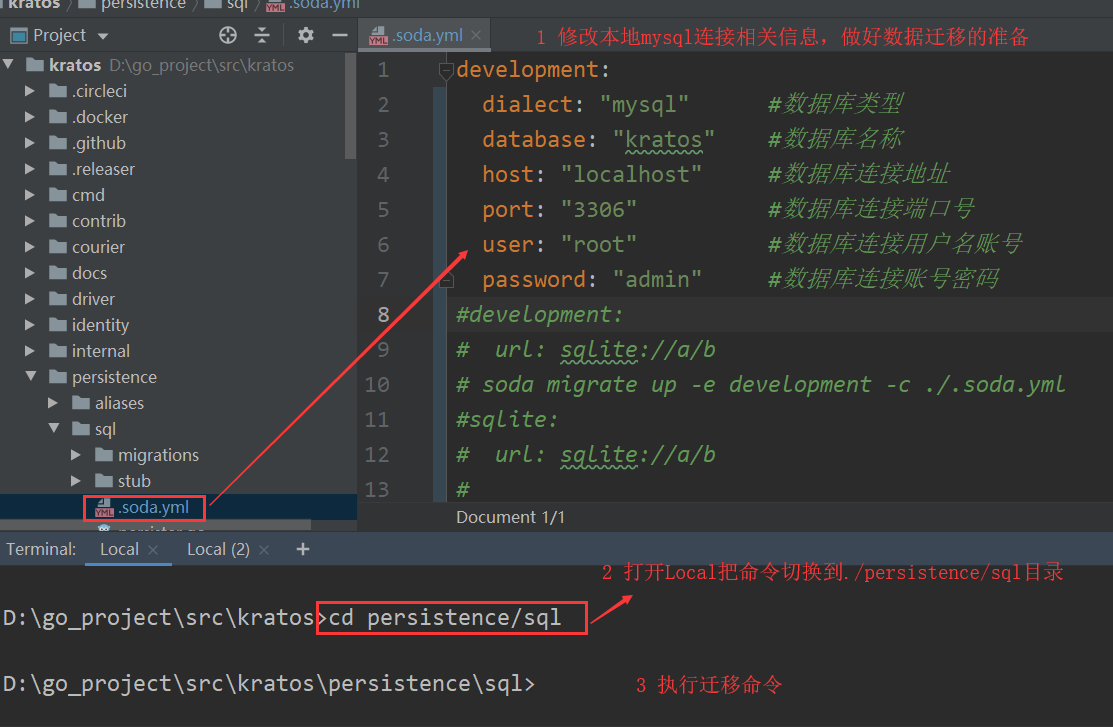
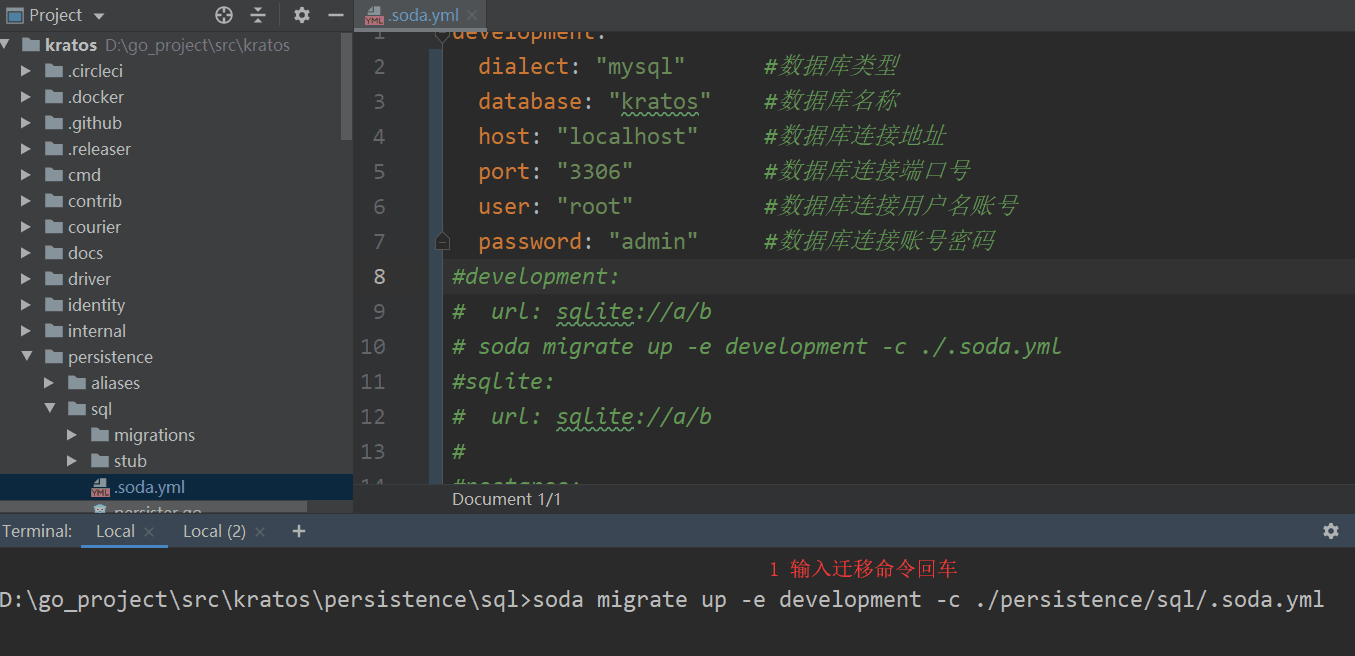
# 4.2.2 输入以下命令,对数据库运行所有“向上”迁移
soda migrate up -e development -c ./persistence/sql/.soda.yml
# 4.3 在Navicat查看是否迁移成功
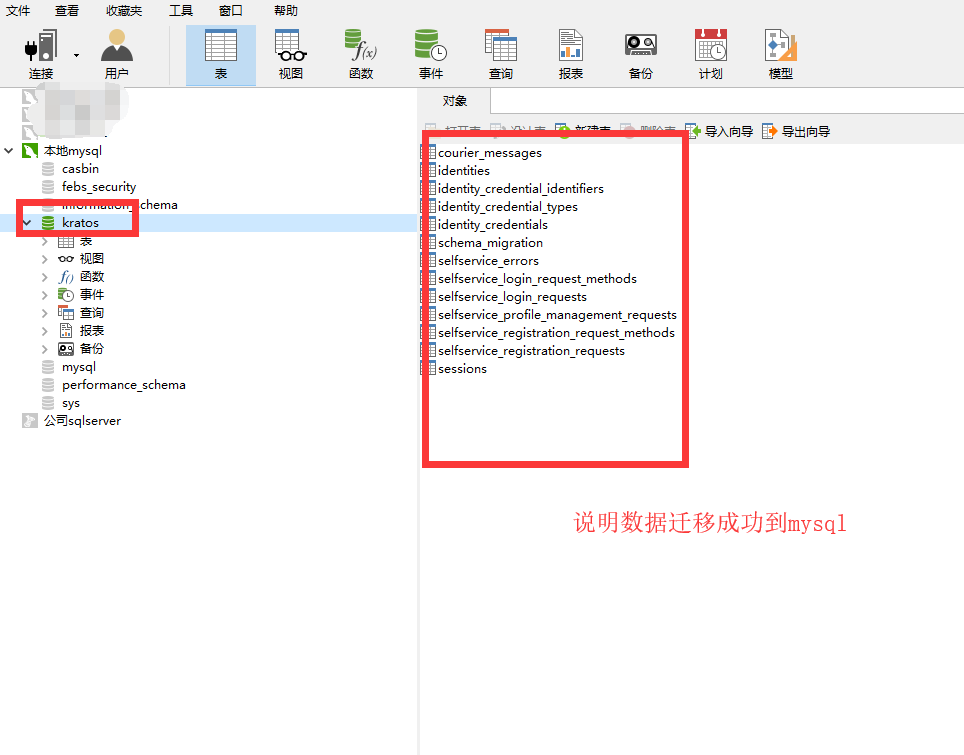
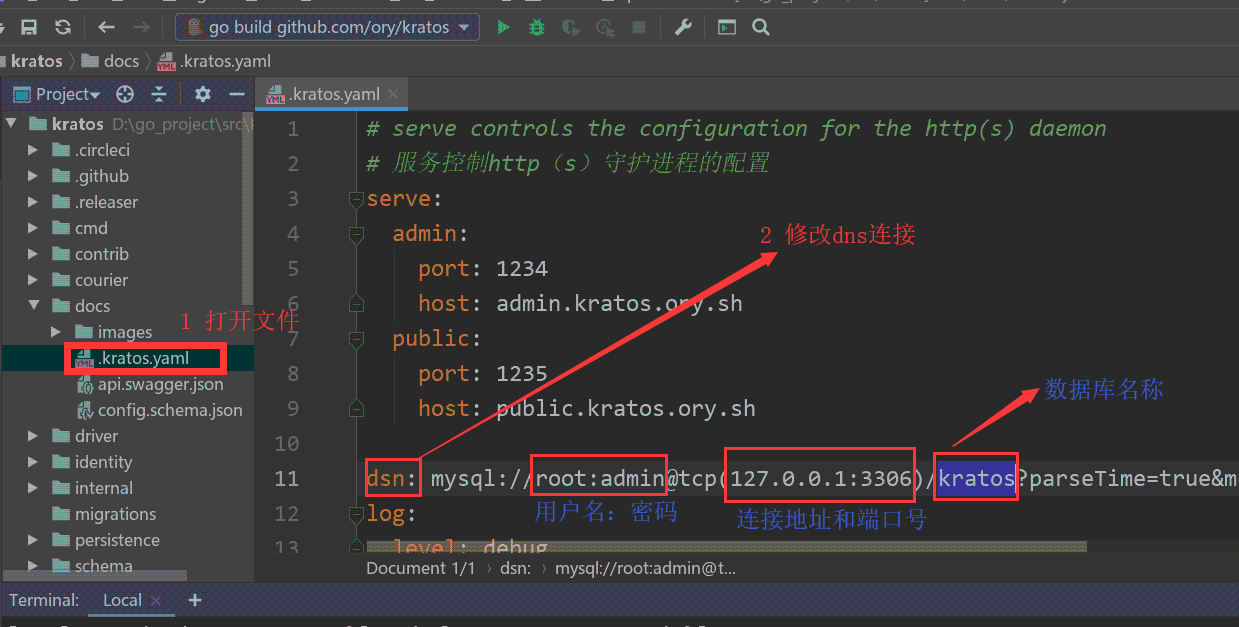
# 4.4 修改kratos的配置文件数据连接
路径在$GOPATH$\src\kratos\docs\.kratos.yaml